
Here it is an pin layout of ESP8622. My particular one is an ESP8622 Node Mcu v3 MOD.
With this esp there is an file called boot.py and anything there will execute whenever you will ran the device.
There is also a file that you can call main.py. And that one will execute after boot.py on each power up.

Not all of the pins are nice. I mean some of them are not that nice and some of them are reserved only to specific purposes. For example pin SLC[D1 – (5)] and SDA[D2 -(4)] are used for i2C communication.
The pins where i have most success for use with button or other appliances like DHT22 are:
Pin D0 – (16), Pin D5 – (14), Pin D6 – (12), Pin D7 – (13), Pin D8 – (15)
Button handling example as class with interrupt
from machine import Pin
import time

class Easybtn():
    def __init__(self, pin):
        self.int_pin = pin
        self.state = False
        self.pin = machine.Pin(self.int_pin, Pin.IN)
        self.pin.irq(trigger=Pin.IRQ_RISING, handler=self.handle_interrupt)

    def handle_interrupt(self,pin):
        if not self.state:
            print(f"Btn {self.int_pin} clicked.")
            self.state = True

    def setState(self,status):
        self.state = status

if __name__ == "__main__":
    print("Easy btn class test...")
    btn = Easybtn(13)
    time.sleep(5)
    if(btn.state):
        print("Btn is set to True")
    btn.setState(False)
Button example
from machine import Pin
import time

# Create a Pin object
pin = machine.Pin(13, Pin.IN)

def handle_interrupt(pin):
    print("I was pressed")

# With every press the hendle interrupt method will be called
pin.irq(trigger=Pin.IRQ_RISING, handler=handle_interrupt)

# Best practice is to set an variable of boolean type cause one button prses
# is generating a lot's of calls to the hadle_interrupt method.
Setting pin values
from machine import Pin

#Adding Init onboard LED
led = Pin(2, Pin.OUT)
led.on()
led.off()
Connecting to wi-fi
def connect():
    import network
    sta_if = network.WLAN(network.STA_IF)
    if not sta_if.isconnected():
        sta_if.active(True)
        sta_if.connect('wifi_name', 'passsword')
        while not sta_if.isconnected():
            pass # wait till connection
    ip, mask, gate, dns = sta_if.ifconfig()
    print(f"{'Network':_^19}")
    print(f"{'IP': <6}{ip}\n{'Gate': <6}{gate}\n{'Dns': <6}{dns}")
    print(f"{'':_^19}")

connect()
MQTT part
import machine
# This is bild in into micropython so handy.
from umqtt.simple import MQTTClient
import ubinascii
import time

machine_id = "0x{}".format(ubinascii.hexlify(machine.unique_id()).decode().upper())

# MQQT Server IP
SERVER = '192.168.9.150'
CLIENT_ID = 'ESPBOARD' + machine_id
port = 1883
user = 'mqqt_user'
password = 'mqqt_password'

# Global value outside
outside = 0

# Whtat will be done on message recieved
def sub_cb(topic, msg):
    # By using global we are telling the program to use
    # outside variable from global scope not local method scope
    global outside
    print(msg, topic)
    # Here we are decoding the message that is in this form
    # b'9.1'
    outside = float(msg.decode("utf-8"))

c = MQTTClient(CLIENT_ID, SERVER, port, user, password)
c.set_callback(sub_cb)
c.connect()

# Subscribing to topic
c.subscribe(b'board/display/outside')

# You can also subscribe to multiple topics but then you have multiple messages
#c.subscribe(b'board/#')

btn_state = 1
while True:
    if(btn_state):
        print("Sending Btn Click to /board/display/btn with payload of 1")
        c.publish("board/display/btn", "1")
        btn_state = 0

    # This checks if there are a new messages with desired topic and if they are
    # the sub_cb() method will be executed
    c.check_msg()
    time.sleep(1)
Current Time with wi-fi and internet .... but without RTC
def setTime():
    ntptime.settime()
    t = time.localtime()
    time_string = f"{t[3]:0>2}:{t[4]:0>2}:{t[5]:0>2}"
    print(time_string)

setTime()

t = time.localtime()
time_string = f"{t[3]:0>2}:{t[4]:0>2}:{t[5]:0>2}"
print(time_string)
Reading DHT22 or DHT11
from machine import Pin
import machine

# for DHT11 change 22 to 11
sensor = dht.DHT22(Pin(16))

def checkDHT(sensor):
    sensor.measure()
    temp = sensor.temperature()
    hum = sensor.humidity()
    return temp, hum

temp, hum = checkDHT(sensor)
print(temp)
print(hum)Then create a new folder call it lib and throw there max7219.py from github.
Handling LED Array
# Connecting on ESP8266
# ESP8266 	MAX7219
# 5V 	VCC
# GND 	GND
# D7 - GPIO13 (HWSPI #1 MOSI) 	DIN
# D5 - GPIO14 (HWSPI #1 SCK) 	CLK
# D8 - GPIO15 	CS

from machine import Pin, SPI
import max7219

spi = SPI(1, baudrate=10000000)
screen = max7219.Max7219(32, 8, spi, Pin(15))
screen.text('ABCD', 0, 0, 1)
screen.show()
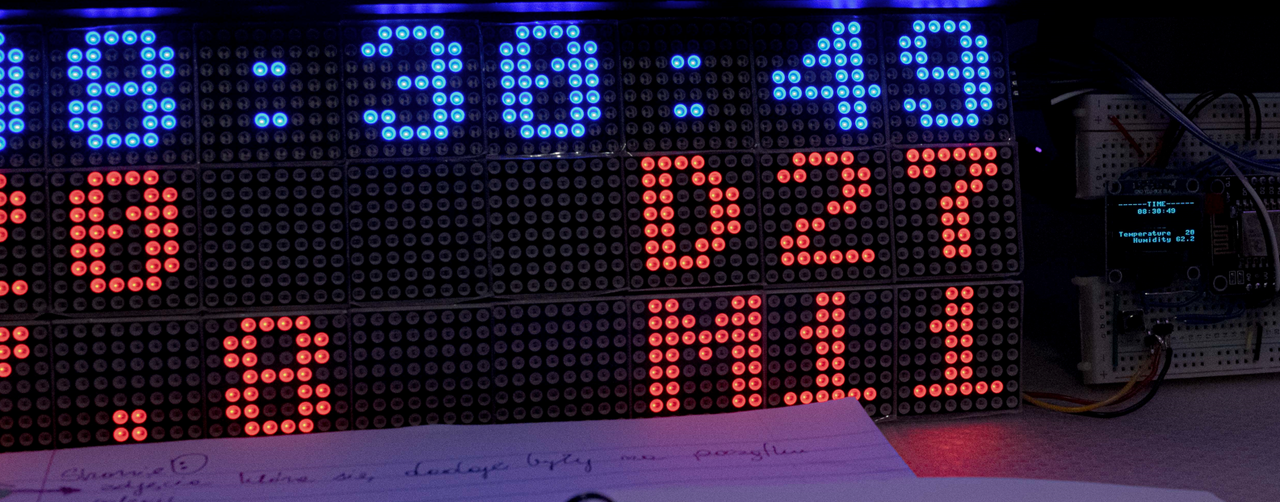
A new update for LED Array, after about 7 hour’s some of the letters ore some of the letters are not really working properly. Especially when im using 6 modules chained together.
You can solve that problem in two ways. One is to use one of built in function screen.init_display().
But that will generate flickering every time the array is run so my fix was to modify the library itself
add refresh method and call it. It worked really well and the issue with the symbols not displaying properly disappeared. Also that function is called every 60 second.
Mod MAX7219 Lib
#Paste that inside the lib
	def refresh(self):
        self._write_command(const(0xC), const(0x0))
        self._write_command(const(0xC), const(0x1))
And then just call screen.refresh() and should work well.

